
Second Annual Bagpipe Holiday Recipe Book
Start the holidays with festive recipes.
December 12, 2022
Last year, we asked the Bagpipe staff members to share their favorite holiday recipes that are staples in their families. The recipes ranged from breakfast foods to pies and cakes and we put them all together to make a Bagpipe cookbook.
The cookbook was such a success that we’re pleased to say we’ve put together a second book filled with new recipes that are just as mouth watering. Whether they’ve been passed down for generations or are only a few years old, each of these recipes holds special meaning and is sure to elevate all of your family dinners.
We hope this recipe book inspires you to get creative and try something new. From everyone on the Bagpipe, we wish you and your families a happy holiday season.
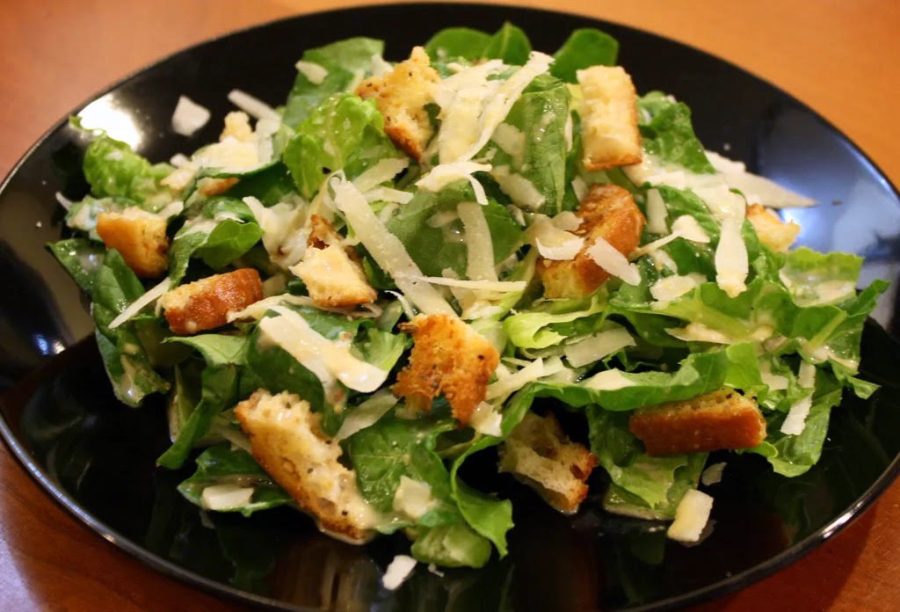
The caesar salad once it’s been prepared and ready to serve. The croutons add a crunch that blends well with the parmesan in the dressing.
Boyd’s Famous Caesar Salad
Some foods are classic for a reason. Caesar salad is one of the most popular and well known salads in the world. The ingredients to a Caesar salad are timeless. The preparation is quite simple and yet requires a healthy balance of all the ingredients.This classic salad is basic but genuinely irresistible. Caesar salad Meet the Boyd Family’s homemade Caesar salad. Yes, you can always buy a boring packaged store-bought version with sub par dressing that tastes like old cardboard or you can try the famous Boyd Family recipe. The Boyd family has mastered every single one of the delicious homemade ingredients over time. Over the years, my family has made the caesar salad recipe easy and quick. It’s so easy you can make the dressing and the rest of the ingredients at home. The heart of my family’s recipe is the caesar salad dressing. The dressing is made up of nine different ingredients that mix together to create the most delicious dressing possibly imaginable. The parmesan cheese puts a cheesy layer over the insides of the salad. The parmesan creates not only a heavenly smell, but also the fresh taste that comes from only the finest of ingredients. The Romaine hearts are the main part of our salad. The sweet and crunchy part of a head of romaine will make you never want to stop eating. The first bite of our family’s salad will reveal the immense flavor and you will be singing its lofty praises. This salad is so important to our family and it marks the beginning of the holiday season. I have many important childhood memories with my family gathered around the dinner table with our caesar salad to the side, talking with loved ones. The process of making the Boyd Family caesar salad also serves as an activity to do with family and friends. When I think of the Christmas holidays, the images of friends, family and food are what I think of.
Dressing Ingredients
- 1 medium garlic clove, minced or grated
- ¼ cup grated Parmesan cheese
- 2 tablespoons lemon juice (1/2 lemon)
- ¼ cup mayonnaise
- ½ cup Greek yogurt
- 1 tablespoon olive oil
- ½ tablespoon Dijon mustard
- 1 teaspoon anchovy paste or Worcestershire sauce
- ¼ teaspoon each salt and fresh ground black pepper
Salad Ingredients
- 2 cups of Croutons
- 3 romaine hearts
- ½ cup Parmesan cheese shavings
Instructions
- For the Salad: Tear the romaine leaves into pieces (or chop them). Top each salad with Parmesan cheese shavings, croutons, and dressing.
- For the dressing: Whisk together the dressing ingredients in a bowl. Store leftovers refrigerated in a covered jar for up to 1 week.
- For the croutons: Tear the bread into pieces instead of slicing it into a cube
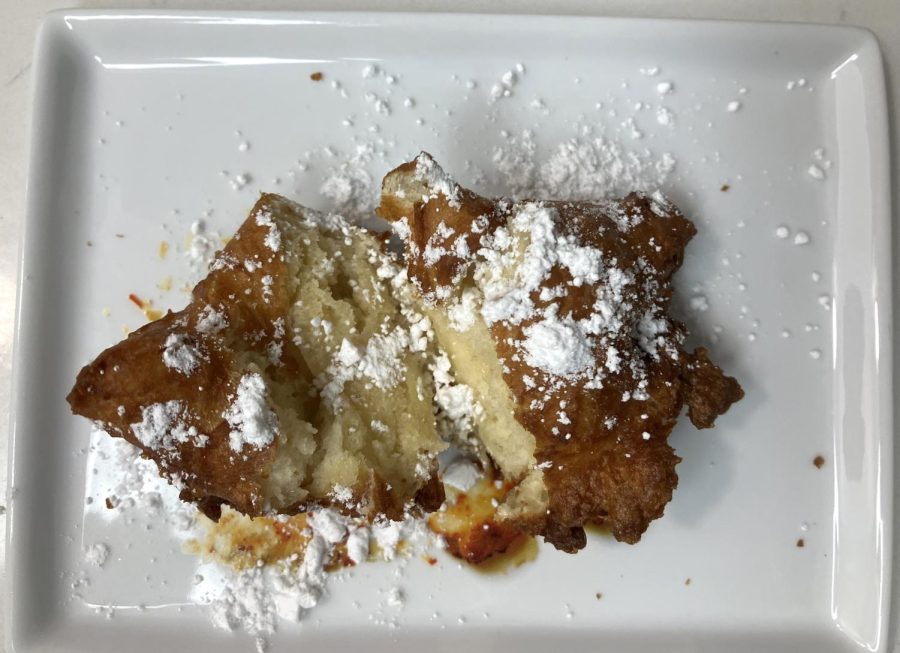
The oliebollen is served with powdered sugar. This dish a traditional holiday Dutch dessert.
Keijsers Koning Dutch Dessert
Oliebollen, or “oil balls” is a traditional Dutch dessert that is only eaten on New Year’s Eve.
My parents were both born and grew up in the Netherlands, and all of my family still lives there to this day. My whole family would eat these every year during the New Year. Well, except for my dad and my Uncle, Omar Joost (Omar is the Dutch word for uncle).
One day while my mom and Omar Joost were at a fair with their sitter, Omar Joost found a stand selling lots of oliebollen. My mom was running around, doing whatever she pleased, leaving Omar Joost and the sitter. The sitter, who invited her boyfriend to hang out, gave Omar Joost as much oliebollen as he desired to keep him distracted. That slightly backfired when he threw it all up, and has never eaten it since. My dad also ate way too much oliebollen and threw it all up as well. Nonetheless, despite the sensitive stomachs, everyone else in the family enjoys and loves oliebollen.
Growing up, my sister and I only ate oliebollen occasionally, both refusing to accept our Dutch heritage. However, in the past few years, my mom became more interested in keeping our Dutch roots by doing things like making oliebollen. My family doesn’t have a specific recipe, but we always add a spin to the online recipes with our craziness.
Baking with my family is not cute and cuddly. It is an endless war, flour and utensils flying, screams that can be heard for miles. And that is just my sister and I. My mom constantly sweeps in to help diffuse the situations but doesn’t do much to end it. Regardless, through all of our battles, the end results are almost always positive.
Making oliebollen has another personal element that makes it all the more special. After struggling with COVID-19 for five months, I was able to bake again with my family. The very first thing that I baked, or rather fried, was oliebollen. It was fun being able to bake and laugh and fight with each other once again in the kitchen, rather than being trapped in a bed.
Now, to bring these delicious, fried goodness to life, the ingredients and recipe is listed below.
Ingredients
- ¼ cup + 1 teaspoon granulated sugar, divided
- ½ cup lukewarm water
- 4 ½ teaspoons instant dry yeast
- 4 cups all purpose flour
- 2 large eggs
- 2 cups of milk
- 1 teaspoon salt
- 1 to 2 cups of raisins ( optional, but considered more traditional)
- Vegetable oil, used for frying
- Sifted confectioners sugar (topping)
Preparing the dough
- In a small bowl, mix the water and one teaspoon of sugar. Sprinkle the dry yeast evenly on the lukewarm water.
- Let the yeast sit on the water for 10 minutes.
- In a large bowl, mix the flour and remaining sugar. Create a well inside the bowl, then add the water and yeast mixture inside the well.
- Warm up the milk, either in the microwave or in a saucepan, until lukewarm.
- Add half of the milk and mix until well combined. Then add the rest of the milk until the batter is smooth.
- Cover the bowl with a damp tea towel and allow the dough to rise for 1 hour.
- When the hour is over, mix in the salt. Normally, the dough will be wet. Fold in the raisins (optional). Let the dough sit while heating up the oil.
Frying the dough
- Heat 3 inches of oil in a large pot or deep fryer, at 350 degrees Fahrenheit. Quickly dip two spoons in the hot oil before using both spoons to pick up dough. Do not place huge amounts of dough in the pot or each oliebollen will be raw.
- Carefully place the dough in the hot oil with both spoons. Immediately, the dough will sink to the bottom before popping back up.
- There can be multiple balls of dough in the oil at a time, but be careful not to overcrowd the pot.
- Fry both sides of the oliebollen until golden brown.
- On a plate with paper towels, place the oliebollen ontop to drain the excess oil.
- Shift confectioners’ sugar onto the oliebollen
- Serve warm
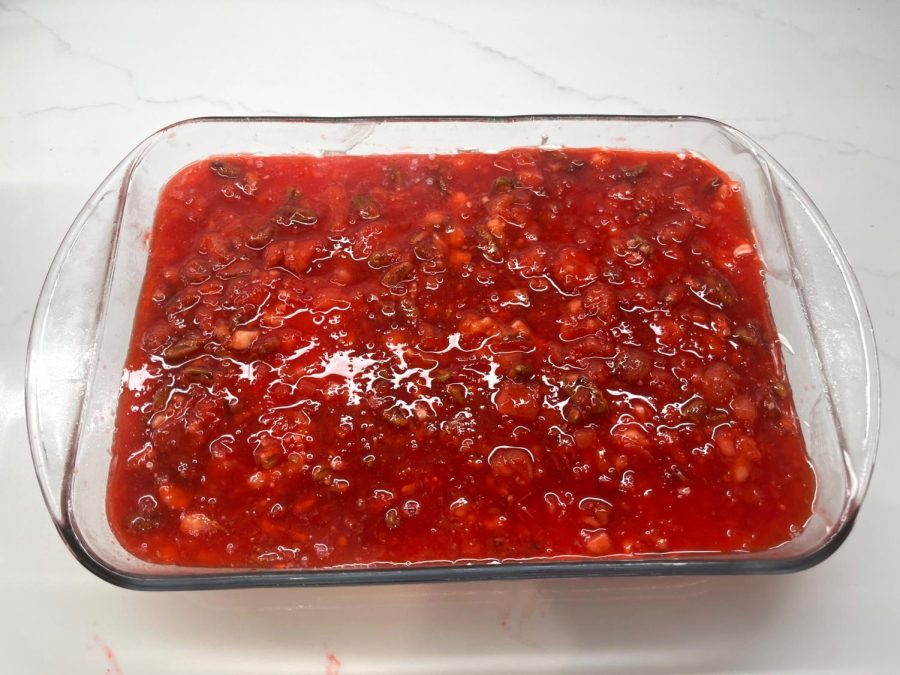
The strawberry “salad” when it’s ready to be served. The recipe has been in the Portteus family for 40 years.
NanNan’s Strawberry Salad
Around 40 years ago, one of my grandmother’s dear friends, Wanda Philips, shared this strawberry Jello salad recipe with her. It was an immediate family favorite and became a staple at each of our holiday dinners and special occasions.
I have fond memories from my childhood in the kitchen with my grandmother preparing this dish together. When I was too young to make it by myself she would let me mash the bananas and spread the sour cream. This recipe takes me back to the time in my childhood when life was much simpler.
I remember walking into my grandmother’s house after a long day of driving to Tulsa. There would always be a fresh made strawberry salad on the countertop waiting for us.
She would have bowls and forks out, ready to dish out one of my all time favorite comfort foods.
The soft smooth texture of jello that you would normally expect is broken up with chunks of strawberry and chopped pecans. Sour cream by itself can tend to be overpowering, but the sweetness of the strawberry jello mixture balances it out perfectly. For years I thought the salad was made with cool whip, not sour cream due to its sweetness.
Apart from the jello set time, this recipe is a quick alternative to a traditional holiday cookie. Strawberry salad melts in your mouth upon the first taste. Flavors coming together in an excellent melody that is bound to touch all of your senses. NanNan’s Strawberry Salad has stood the test of time, and is guaranteed to shock your guests when they try it. I highly recommend that everyone adds this piece of my family history onto their holiday dinner table.
Ingredients
- 4 small boxes of regular strawberry jello.
- 2 Сups of boiling water,
- 3 mashed bananas.
- 2/3 cups of chopped pecans.
- Well drained can of crushed pineapple.
- 1- 23.02 oz container frozen strawberries,
- ****OR*****
- 2-15.5 oz cartons of frozen Strawberries (Measure 23.02 oz)
- 16.02 oz container of sour cream
Instructions
- In a large bowl combine jello packets and boiling water, mix until dissolved
- Fold in strawberries, Crushed pineapple, bananas and Chopped pecans,
- Pour ½ mixture into large large rectangular pyrex dish
- Refrigerate until firm.
- Once firm, spread an even layer of sour cream on the set layer. Be careful not to puncture the jello below.
- Gently Spoon the rest of the jello mixture onto the sour cream.
- Refrigerate for two hours or until firm.
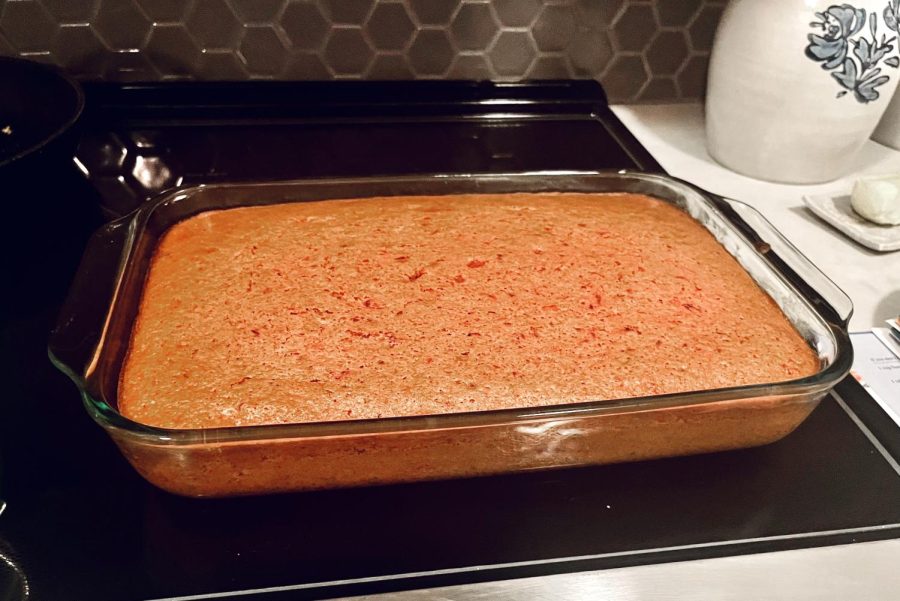
The strawberry cake after coming out of the oven. The cake can be served warm or room temperature.
Knutson Family Strawberry Cake
While I look forward to many amazing foods during Christmas dinner with my family, nothing could ever replace my family’s strawberry cake. This recipe is the first request at any family event and has brought so much joy to my family for six generations, even with its sweet simplicity. No one in the family knows how my great-great-great grandmother found this recipe, however there is a possibility that it was just an old Betty Crocker recipe.
I have photos of me enjoying this sweet treat since I was born and can’t remember a family gathering where it wasn’t present. My grandma makes sure to bake it for every birthday and holiday.
Even though this recipe does use a regular white cake mix, the addition of a few ingredients really makes the recipe special. The cake is extremely moist and every bite is delicious.
My namesake, being my great-great-great grandmother, was the first to make this recipe. Normally, I make this recipe with my grandmother, I can remember baking it with her as just a toddler. I can’t remember the last time that I didn’t make this cake with my grandma for my birthday, which has led to some of my favorite memories.
One time that sticks out in my mind is when we first moved to Dallas and my family wanted to make the cake for my birthday. It was late at night but my mom was insistent on baking this cake on my birthday. We drove around for what felt like forever to find a grocery store that was open. We finally found one, but had to change some of the ingredients because the store we were at was not well stocked.
We used yellow cake mix instead of white cake mix, and made a few other substitutions while we were making the cake. After it was baked and we tried it my mom decided that she loved this cake more than the original recipe. Since then she has always made the recipe this way and it always reminds us of our fun adventure that night.
While this step isn’t necessary, my family pokes the cake with a fork when it comes out of the oven to create small holes for the icing to seep into the cake, and then we immediately pour and spread the icing over the cake. If you don’t like strawberries you can substitute most fruits for them.
This strawberry cake is perfect for Christmas or any other occasion and can be served warm or cold, according to your preference.
Cake Ingredients
- 1 Package of white cake mix (or yellow cake mix)
- 1 Package of frozen strawberries (thawed)
- Reserve ⅓ to ½ cup for icing
- 1 Package (3oz) strawberry Jello
- 1 Cup oil or applesauce
- 3 Tablespoons flour
- ½ Cup of water
- 4 Eggs
Icing Ingredients
- Reserved strawberries
- 2-3 Tablespoons of butter
- 3 Cups powdered sugar
Instructions
- Preheat the oven to 350° and grease a 9 by 13 baking dish with butter.
- Mix ingredients for the cake together using a hand mixer in a large bowl.
- Pour mix into the baking dish and bake for 25 to 30 minutes until a toothpick comes out clean.
- While the cake is in the oven, mix all the ingredients used for the icing together using a hand mixer in a large bowl.
- After taking the cake out of the oven, pour icing over the cake and serve. Enjoy!
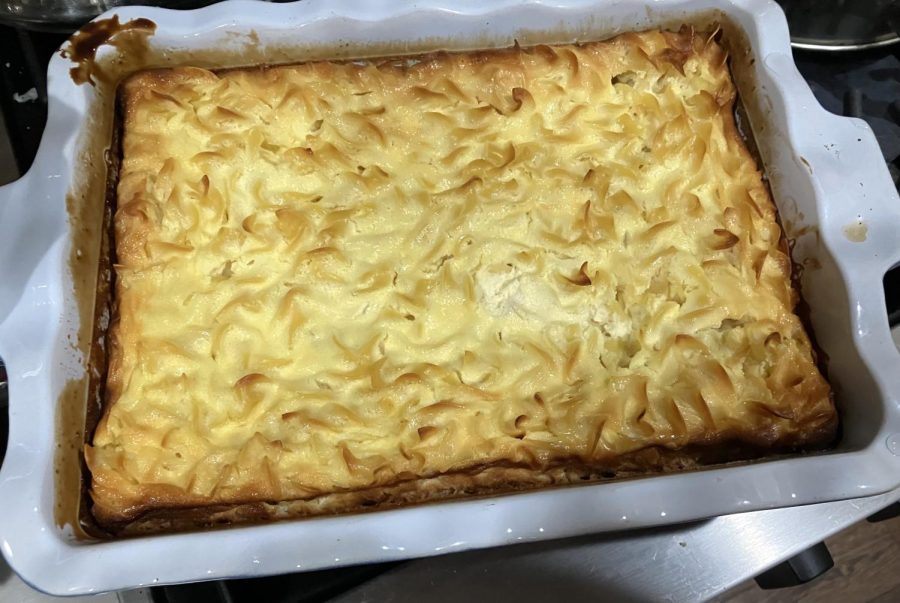
The kugel once it’s been cooked to a golden brown. For best results, use the Manischewitz brand noodles.
Engel Family Kugel
My favorite recipe to make with my family is something called kugel. Kugel is a traditional Ashkenazi noodle pudding where egg noodles are baked in a dairy mix. It can be either sweet or savory, but my favorite is always sweet.
As much as I would love to recall sentimental memories of my mother whisking eggs and my father sprinkling cinnamon over a steaming dish pulled straight from the oven, that never happened.
For me, kugel does not conjure cherished childhood memories of family and sneaking down for a sweet midnight snack. This wasn’t a recipe my family made when I was little, and seeing as I was not confined to a bedtime, I never had to sneak. Instead this recipe reminds me of two things far more cherished, fire and bribery.
My uncle loves kugel. Not in a casual “swipe right” kind of way, but in a “til’ death do us part with a shiny diamond” kind of way. Much to my joy and his chagrin, I was the only person who made the recipe he loved so much. This gave me leverage, just like Obi-wan, I had the high ground.
As a nine year old I was, in no uncertain terms, a jerk. Not only did I feel no guilt in using this new found advantage, I enjoyed and abused it to the fullest.
Walking into my uncle’s house one Friday night for dinner, I saw something on the counter. A magical, mystical and glorious something. I saw a one-foot-tall cylinder made of beauty herself. I saw a blowtorch.
Not a minute later I had a plan. He got a kugel, and I got to use the blowtorch. This seemed more than fair to me. Giving a child who viewed My Little Pony as the single greatest human accomplishment a gas fueled power tool may seem just a little bit unwise. But not to my uncle, because quicker than an impatient poker player he said “deal.”
This recipe does bring forth fun memories of my family, just maybe not the classic family dinner around a table kind. Kugel doesn’t make me think of holiday dinners but it does make me think of standing at the red kitchen island, lighting a tea candle the size of my eye with a blow torch the length of my forearm; and for me, that’s even better. Plus it tastes good.
Ingredients
- 12 ounces or one package of wide egg noodles
- Six eggs of no particular size
- Two cups sour cream
- 8 ounces cream cheese
- I cup granulated sugar
- ¼ cup melted butter
- ¼ teaspoon salt
- ½ teaspoon cinnamon
- Extra cinnamon and sugar for sprinkling on after baking
Instructions
- Preheat oven to 350 F
- Add water to a pot and boil, cook the noodles for 3-4 minutes
- Mix everything else in one bowl
- Spray an about 9×13 pan (make sure it’s oven safe too)
- Pour the noodles into the dish and spread evenly
- Do the same with the dairy mix
- Bake for one our
- Dust with cinnamon and sugar
- Serve either hot or cooled
Tips
For this recipe, make sure your ingredients are room temperature before you mix them so that they blend well. When you’re cooking the noodles, don’t cook them all the way or else they will become soggy.
Also on the topic of noodles, my advice is to buy the Manischewitz brand noodles. Lastly, make sure to turn the kugel over halfway through baking so it’s cooked evenly.
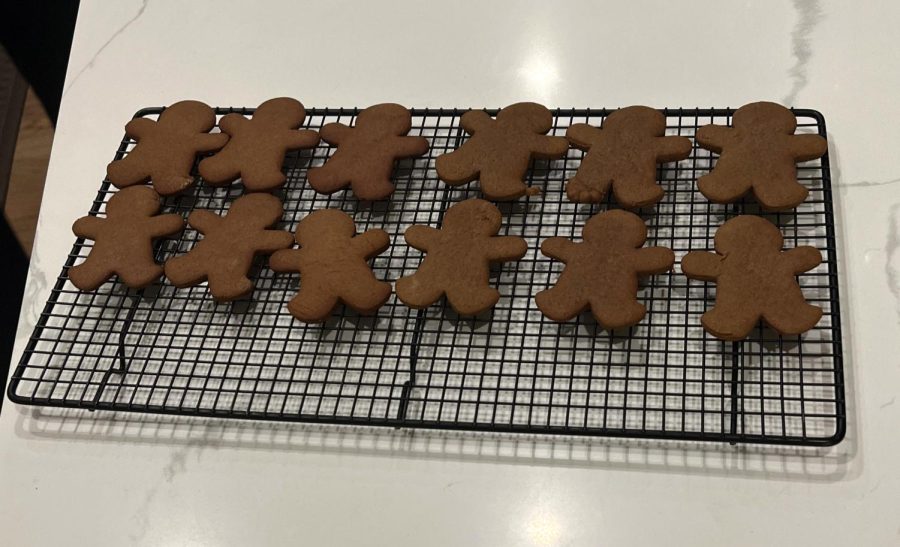
The gingerbread cookies when they’re out of the oven and cooling. They can be iced and decorated to add to the festive feeling.
Levy’s Gingerbread Cookies
When my mother was five years old, she befriended a schoolgirl named Rachel Munson and they became lifelong best friends. Rachel’s mom always made cookies for the kids, and when my mom became old enough, she asked for the recipe so she could make the cookies for her family.
These cookies are now a Christmas tradition in the Levy family, and every year for over forty years, these cookies have been made at Christmas time, bringing good cheer and happy memories for all to enjoy.
When I was younger, Christmas was magical. My family is half Jewish and half Christian, so the only time I would get to experience the household “vibe” of Christmas Time was when we went to visit my grandparent’s house in Wisconsin.
Every Christmas was beautiful and it never lost its splendor even as I got older. The Christmas songs, the snow and most importantly, the cookies were the best parts of the holidays.
The cookies were absolutely delicious and tasted like heaven. Never in my life have I had gingerbread cookies half as good as the ones my mom makes.
I looked forward to decorating the cookies every year, and every year, we made different colors of frosting to decorate the cookies. Most of the cookies I decorated were less than adequate, but it was still a lot of fun.
My favorite gingerbread cookie related story happened back when my mom was in college, around Christmastime. She was taking gingerbread cookies to a friend’s house when she had to get out of her car, and while she was away, her car was broken into. The burglar stole her CD player and the plate of cookies, meaning that those cookies looked delicious enough to steal.
For a while, gingerbread was believed to have medicinal properties and it was used to treat stomach aches. Gingerbread might not be medicinal, but it does taste delicious.
This recipe is easy to make and contains standard ingredients and cookware present in any well equipped kitchen, so you can enjoy cookies quickly and easily.
Ingredients
- 3 ¾ cup flour
- 1 tsp. Baking soda
- ½ tsp. Salt
- 2 tbsp. Cocoa powder
- 2 tbsp. Ginger
- 1 tsp. Cinnamon
- 2 tsp. Cloves
- 1 cup softened butter
- 1 cup sugar
- 1 egg
- ½ cup molasses
- (Icing, optional)
- 1 lb confectioners sugar
- 1 tsp. Vanilla
- ⅓ cup water
Instructions
- Sift flour, soda, salt, cocoa, ginger, cinnamon, and cloves onto wax paper (or bowl).
- Beat butter, sugar, egg, and molasses until fluffy. Stir in flour mixture until well blended.
- Wrap in plastic – refrigerate several hours or overnight.
- Roll out dough, ⅓ at a time on lightly floured surface to ¼” thickness.
- Cut with lightly floured cutters.
- Bake at 350 degrees Fahrenheit for 8 minutes.
- Makes 3 dozen large cookies.
- Let cool and frost.
- For icing, stir until smooth. Add more water, 1 teaspoon at a time, until icing flows easily. Add red food coloring to icing if desired.

The cookies once they’ve been cooled and plated. The combination of chocolate and peppermint is classic and delicious.
Madsen’s Peppermint Cookies
After many years of trial and error, my mother found the perfect chocolate chip cookie recipe. It’s the perfect combination of chocolate and gooey doughness and can be made more festive by adding crushed peppermint to the batter to give it a holiday feel and the perfect crunch.
Ever since this recipe was discovered we have never made another cookie recipe. Nothing comes close to these cookies. This cookie recipe has the perfect gooey texture and huge chocolate chunks. Walking downstairs and smelling the familiar scent of the cookies in the oven fills me with joy.
Each year I make these cookies for my friends and teachers and every year without fail, I hear back from them saying how delicious they are and asking for the recipe. They are perfect to give to anyone as a gift.
The cookies are simple to make, making them the perfect easy December midnight snack. The consistency of the dough makes the cookies melt in your mouth after warmed just the right amount. Combine the cookies with a glass of milk and you have yourself a feast.
Having such a perfect cookie recipe is a perfect way to get the family together and to share the deliciousness. Every year we bake a ridiculous amount of cookies and give them to friends and family to spread the holiday cheer and to make people’s day.
Simply eating a single cookie makes my entire day and I’m sure it will make yours as well.
Ingredients
- 14 tablespoons unsalted butter softened
- 1 cup granulated sugar
- ½ cup light brown sugar
- 2 eggs
- 1 teaspoon vanilla extract
- 2½ cups all-purpose flour + a few extra tablespoons, see ** in directions below–I used 2 extra tablespoons
- 1 teaspoon baking soda
- ½ teaspoon salt or sea salt
- 2 cups chocolate chips ( any variation of chocolate chips or chocolate chunks)
- ½ cups crushed peppermint
Instructions
- Preheat the oven to 350 and line a few trays with baking paper or spray with non-stick spray.
- In a metal bowl, place the butter inside the bowl and place in the preheating oven.
- Leave it just for a few minutes, until the butter starts to melt around the outside (approx ½ of the butter melted). Take it out of the oven to cool.
- Once the butter has cooled, add both sugars and beat with a mixer until light and fluffy.
- Add the vanilla and eggs, beating between each addition just until mixed.
- Add the flour, baking soda and salt or sea salt and beat on a low speed, just until combined. If you find that the dough is wet, you probably need a little more flour.
- If needed, add more flour, a tablespoon at a time, until the dough starts coming together to start forming a ball and not sticking to the sides of the bowl as much.
- I added 2 extra tablespoons of flour to the 2 ½ cups flour – if you use over 3 tablespoons, it’s too much.
- Fold in the chocolate chips until just incorporated.
- Use an ice cream or cookie scoop (¼ cup for large, 1.5 tablespoons for medium) and drop the dough onto the prepared baking sheets, allowing room for spreading. Pat down cookies just a little and press additional chocolate chips on top of cookie dough if desired.
- Bake one tray of cookies at a time, for 10-12 minutes for large, 8-9 for small. Don’t over-bake and allow to cool on a wire rack.
- Makes 1 dozen large or 2 dozen small cookies.
- Store cookies in an air-tight container.
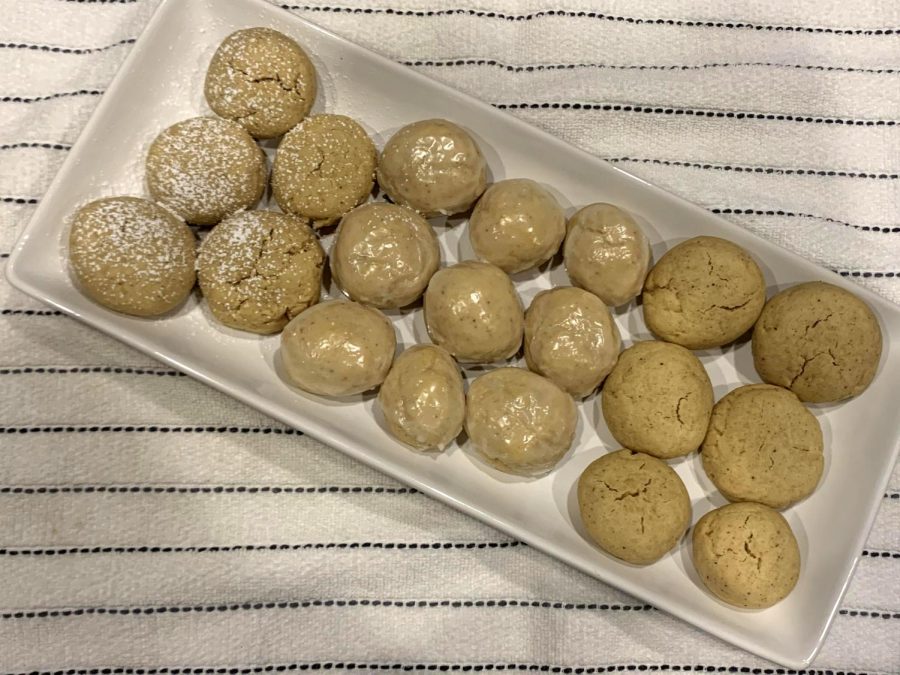
The cookies once they’ve been baked and taken out of the oven. Topping them with powdered sugar is a perfect, final touch.
Stimac’s Croatian Honey Cookies
There truly is nothing like honey and spice cookies during a cold day. If I could put Christmas spirit into a cookie, it would taste like the honey cookies my family makes each year.
These honey cookies are adapted from a recipe by a blog when I started making them a few years ago in an attempt to connect with my Croatian heritage. Ever since then, they have become an absolute necessity to have in my house during the holidays.
I think this recipe’s biggest strength is that all of the spices and ingredients needed are common household staples. While making the cookies requires a bit more than a pan and one bowl, it’s still a relatively easy recipe to execute.
Both of my parents immigrated to the United States at a young age, each trying their hardest to become devoid of the cultures that were carried with them. My dad immigrated from a war-torn Croatia, Yugoslavia at the time, and my mom moved all across the world, Nigeria to Canada to France, following her dad’s engineering job.
These cookies are a recipe from my dad’s side of my heritage, and I have had to resort to Google to find the right recipes. The blog I used was about exploring the Balkans, so I’ve made a few adjustments, such as generally resorting to eyeballing the spices, but using measuring spoons is fine too. The honey specifically is very subtle and easy to overpower, so careful measurement is needed. The cookies on their own are fantastic, but also you can add a topping to make them even better. I like to use plain powdered sugar, add a bit of milk, and create a glaze to put on top. One warning however, when it comes to making powdered sugar glaze, a little bit of milk goes a very long way.I know the amount of powdered sugar makes it look like it needs a lot of milk. It does not. Start small with just a splash of milk, stir it, and use whatever utensil you’re using to test the consistency.
These honey cookies have such a warm and welcoming tasting, perfect during this season. The spices and the honey come together wonderfully, and it’s my favorite thing to make over the holidays for friends, family and more.,
Something to note about these cookies is that they will never, and I mean never, give you the gratification of knowing that they are done. The cookies will get lighter instead of darker when baking in the oven, so I always need to break one open on the sheet to see if they are done.
Ingredients
- ½ cup brown sugar
- ½ cup butter
- ½ cup honey
- 2 eggs
- ⅓ tsp cloves
- ½ tsp ground ginger
- ½ tsp ground nutmeg
- 1 tsp cinnamon
- 2 ¾ cups all purpose flour
- 1 tsp baking soda
Instructions
- Preheat the oven to 350 F
- Melt the butter in a saucepan on low heat. Once the butter is fully melted, add in the honey and use a whisk to fully combine it. At first, the honey and butter won’t want to combine, but just keep at it.
- In a separate bowl, mix together all the dry ingredients; the flour, spices, and baking soda
- In a big bowl, add the eggs and sugar together and combine, and then add the honey and butter mixture.
- Into the bowl of wet ingredients, add the dry and combine.
- Line a baking tray with parchment, and measure out a rounded tablespoon of dough until you fill out the sheet with rows of 3s and 2s.
- Put the tray in the oven and bake for 8-13 minutes, until they are a pale brown. Wait about two minutes, and then put the cookies onto a cooling rack or another plate. You don’t want the bottoms of the cookies to continue baking while the rest isn’t.
Optional
- Either dust with powdered sugar, or create a glaze. Use about an eighth of a cup to a quarter of powdered sugar with a bit of milk and mix it until it is the correct consistency for drizzling.
- Drizzle on top of the cookies.
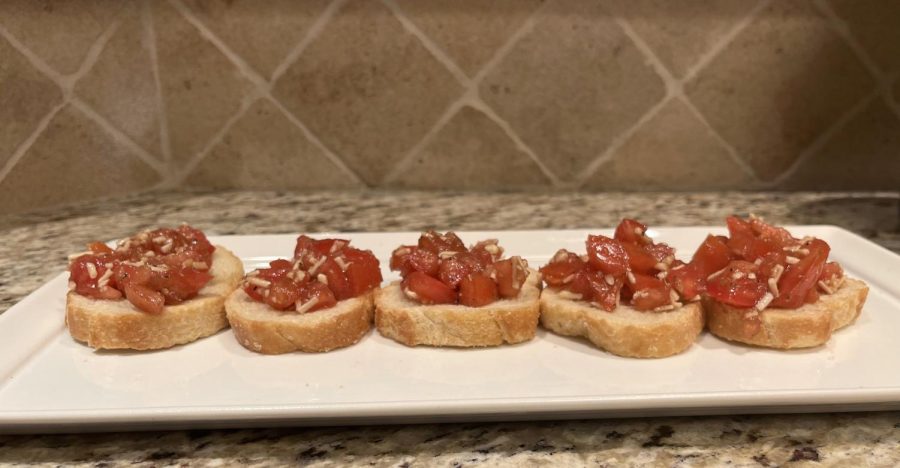
This bruschetta makes for the perfect holiday appetizer. The bruschetta mix is made with tomatoes, basil and balsamic vinegar.
Cooper’s Holiday Bruschetta
The holidays are always a great way to spend time with family and friends and although long family recipes being passed from generation to generation is a great way to remember past family members, I created a new dish to spice up my family’s tradition.
Even though my family isn’t Italian, I appreciate and like to create a specific Italian appetizer that’s simple and easy to make, bruschetta. It’s toast bread topped with tomatoes, Parmesan cheese, garlic and fresh basil.
Exactly two years ago on the day of my family’s annual Christmas Eve dinner I was rather bored with my family’s cooking. Year after year it was all the same, so I came up with a recipe to make bruschetta. I had remembered making bruschetta years prior with my grandmother, however, I thought her recipe lacked a certain flavor, so I tweaked a few things on her recipe. I decided to add fresh basil, garlic and balsamic vinegar to the mix, making the perfect Bruschetta. As soon as I arrived at my family’s annual Christmas Eve party all my family members flocked immediately towards me, asking questions about the new colorful and festive dish that I was holding. Of course they questioned why I made an Italian dish when my family isn’t actually Italian, but the short answer I gave them was simple, I just liked Italian food and I felt like making it. As soon as my family members took the first few bites of my Italian appetizer they couldn’t get enough of it, by the end of the night I hardly had any. From that point on I decided to make a new tradition and make bruschetta every Christmas Eve for my family.
Ingredients
- 1 loaf French bread, cut in ¼-inch slices
- 2 tablespoon extra-virgin olive oil
- 8 roma tomatoes, diced
- ⅓ cup chopped fresh basil
- 1 cup Parmesan cheese
- 2 cloves garlic, minced
- 3 tablespoons balsamic vinegar
- ¼ teaspoon kosher salt
- ¼ teaspoon black pepper
Instructions
- Chop the tomatoes until there’s small hunks
- Add Parmesan cheese and basil (break up the basil into small pieces)
- Add salt and pepper
- Add minced garlic
- Mix together
- Add balsamic vinegar and olive oil
- Cut bread into slices (can toast bread if preferred)
- Top the tomato mixture onto the slices of bread
- Enjoy!
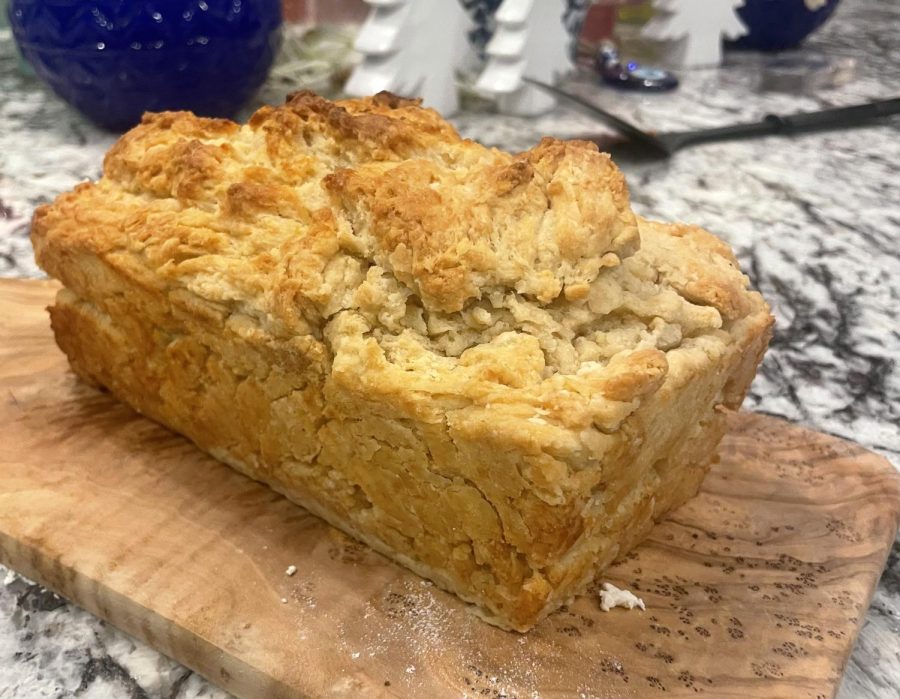
Bear bread is served on a wooden board with chili. The bread is an easy, simple dish to prepare.
Howell Holiday Bread
Christmas is a day of celebration, comfort, and relatives.
After waking up and opening presents, the day turns into a lazy day spent with family. Though, the thing I look forward to the most is the food that our family calls tradition, beer bread. Though this food is not necessarily a meal, it goes with almost everything, but most importantly, it goes alongside my mom’s chili.
Years ago, when my parents were creating a family, they were thinking of a food that represented everything they valued in family: simplicity and comfort. That is when the tradition of beer bread came alive, and since then, Christmas has consisted of a movie marathon and this bread. Beer bread makes its first appearance of the year around Thanksgiving and sticks around till the new year.
The warm, buttery perfection of this bread is the perfect Christmas meal, but what makes it most appealing is the simple and fast preparation time. It can be finished within an hour, with ingredients found around the house.
The baking process is just as simple as the ingredients. All that is needed to make this ideal Christmas day bread is butter, flour, sugar, baking powder, and beer. Put all of it in a bowl and mix, put it in a pan, drizzle butter on top, and bake for an hour.
This bread is the perfect meal for when the cold winter season comes. It has represented a lot of meaning to my family and has created a tradition I will forever cherish. I hope after trying this recipe, it will become just as special to your family.
Ingredients
- 3 cups flour
- 3 teaspoons baking powder
- 1 teaspoon salt
- 1⁄4 cup sugar
- 1(12 ounce) can beer
- 1⁄2 cup melted butter
Directions
- Preheat oven to 375°
- Put flour, baking powder, salt, sugar and beer into a large mixing bowl
- Mix
- Pour mixture into a bread pan
- Pour butter on top
- Put in oven and bake for an hour
- Let cool for 15 minutes
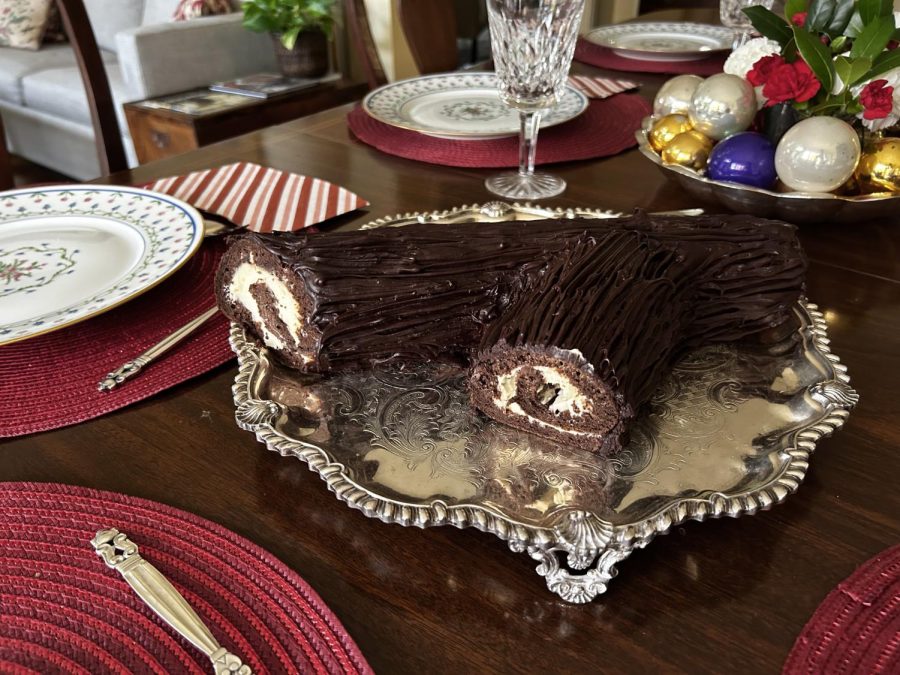
The delicious Yule log is served on a silver platter. The dish has been a holiday staple in their family for years.
McKenzie’s Yule Log
Challenging to make, rewarding to eat
Buche de Noel or a Yule log, is a traditional French dessert that my grandma ordered from a bakery in Austin for years, although I thought she was making them by hand until I was 10-years-old.
When I moved to Dallas three years ago, I was left without any bakery that made a yule log, so I decided to try and make one for Christmas on my own. My first year attempting to make this dessert was rough, but I managed to get the notorious interior swirl that any good yule log should have. The primary disaster lay in the frosting, which curdled after I put it in the fridge despite instructions telling me not to. This led to a very rustic-looking final product that I was able to correct on following attempts.
Yule logs are a challenging dessert that can really only be achieved if you are committed to spending six hours in the kitchen, but they sure do impress people when you show up for Christmas dinner with a beautiful rolled-up cake.
As long as you have a little patience and gentle hands, you will be able to create this delicious, rich, and chocolatey dessert.
The cakes are extremely fragile, making them difficult to handle. To ensure that the texture is light and thin, make sure to fold the egg whites into the flour and egg yolks very gently. Additionally, the cake cannot be overbaked, so be sure to keep the baking time under 12 minutes or else you will risk a cracked yule log.
Although they can be difficult to perfect, yule logs are an adaptable dessert. You can take the cacao powder out of the cake to make a vanilla cake, or you can use white chocolate in the recipe to make a white chocolate frosting.
In terms of festive decorations, the traditional approach is to make meringue mushrooms and stick them all on the cake, but I don’t care for meringue, so I leave them out. Instead, my mother added a little plastic reindeer and a Santa Claus sleigh as a festive replacement.
Overall, there are a vast amount of ways to customize your yule log and make it more suited to your family, but no matter how you change its exterior, the cake will still taste great.
This year will be my third time making a yule log for Christmas Eve, although it can be made to celebrate any holiday or special event.
My recipe is no carbon copy of the professionally-made yule log my grandma ordered in Austin. However, it still sparks the warm memories of spending time with family and the anticipation of unwrapping presents.
Cake Ingredients
- 4 tablespoons salted butter melted
- ¾ cup melted flour
- 6 eggs separated
- ¼ cream of tartar
- ¼ teaspoon salt
- ¾ cup white sugar
- 4 tablespoons cocoa powder
- ½ teaspoon baking powder
- 1 teaspoon vanilla extract
- ¼ cup strong coffee cooled
- ¼ cup powdered sugar
Filling Ingredients
- 4 ounces cream cheese (room temperature)
- ½ cup powdered sugar
- 1 cup heavy whipping cream
- 1 teaspoon vanilla extract
- ¼ teaspoon salt
Frosting Ingredients
- ¾ cup heavy whipping cream
- 1 tablespoon corn syrup
- 12 ounces semi-sweet chocolate chopped
Instructions
- Preheat oven to 350 and line a 12 by 17 inched pan with parchment, butter, and flour. The pan should have an excess amount of parchment paper hanging over the edge to make it easier to pull out the cake once baked.
- In a large bowl beat egg whites, cream of tartar, and salt till the mixture is frothy. Add ¼ of the sugar then beat till stiff glossy peaks form.
- Sift flour, cocoa powder, and baking powder into a bowl. In another large bowl mix the remaining ½ sugar, egg yolks, and vanilla extract. Beat until thick and add cooled coffee and melted butter then mix till combined.
- Add the previously made flour mixture to the yolk mixture and lightly beat the mixture until well combined. Gently fold in the egg whites until no streaks remain.
- Pour the mixture into the prepared pan and spread evenly to every corner. Bake for 10-12 minutes until the cake springs back when lightly touched. The cake may be a little tacky when done but be careful not to overbake because it will cause cracks in the cake when rolled.
- Immediately after the cake is taken out of the oven release the edges of the cake from the pan by running a knife around the edge. Dust the top of the hot cake liberally with powdered sugar and cover the top with a clean kitchen towel. Finally, add a large wire wrack over the towel covering the entire cake. Holding all elements together flip the cake so it comes out of the pan and onto the rack and towel. Gently remove the parchment from the bottom of the cake and dust powdered sugar as you did to the top.
- Beginning with the long side in hand roll the cake with a towel. Use the towel to tightly roll the cake; the towel will be inside the cake. Add cake to fridge seem side down then let cool for an hour.
- To start the filling, get a large bowl and beat the cream cheese on low speed until just smooth. Mix in the powdered sugar and mix till smooth. Little by little add in the whipping cream a ¼ cup at a time till out of cream. Make sure the mixture is smooth before adding another ¼ cup. After all whipping cream is added, enhance the speed to high and beat till stiff peaks form. Add in vanilla extract and beat for a few seconds.
- After the cake is cooled carefully unroll the cake and remove the towel. Take the filling and spread it onto the cake leaving a gap between the edge of the cake and the cream about a ½ inch. Roll up the cake again with parchment on the outside and an extra tight layer of plastic wrap. Stick the cake back in the fridge for 2-3 hours.
- While the cake is in the fridge make the frosting. Take a small pan and bring heavy cream and corn syrup to a simmer. Take the heavy cream and pour it over the chopped chocolate. Let the mixture sit for five minutes with plastic wrap over the bowl. Mix until the chocolate is melted from the heat of the heavy cream. Let sit at room temperature for two hours, the mixture will thicken.
- Carefully unwrap the cake onto a cutting board. Make a diagonal cut on one-fourth of the cake to make a branch. Place the branch on the side of the cake then put it on a platter and trim the exposed ends of the cake to reveal the swirl. Spread the cake with frosting over all sides of the cake except the swirls. Take a fork and drag it through the frosting to create a bark effect.
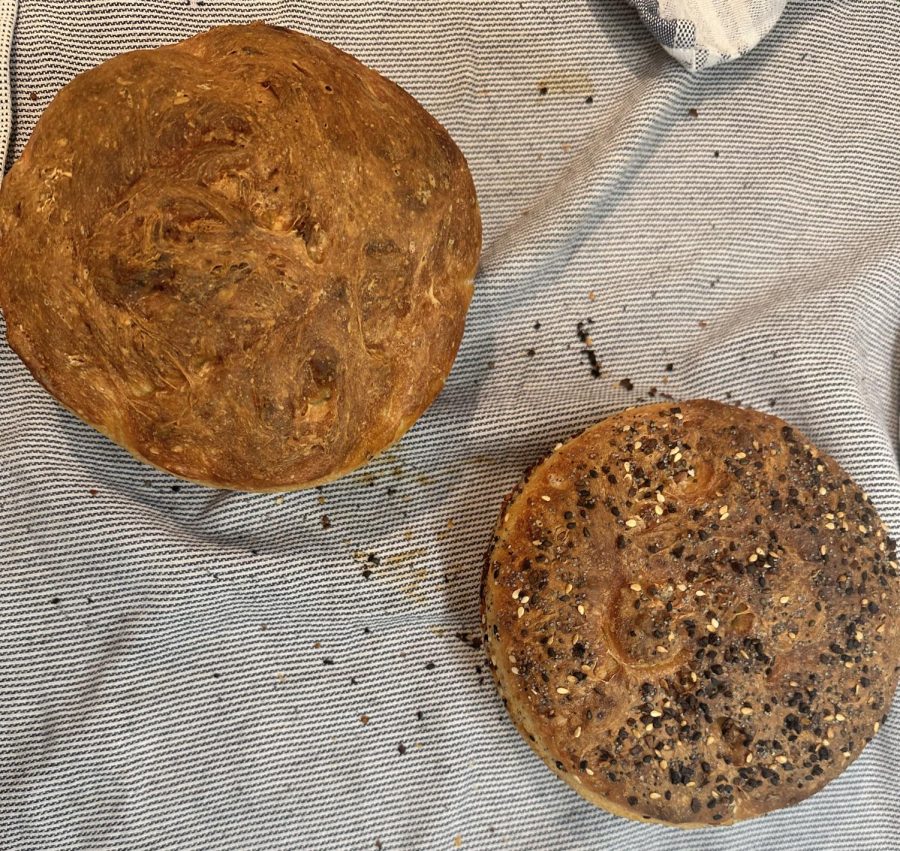
Freshly baked sesame and sourdough bread sit side by side. The side dish is a favorite in the Lazzaro family.
Lazzaro’s Homemade Sourdough
Delicious homemade bread is family’s staple dish
Five years ago, the Lazzaro family added fresh baked bread to their repertoire of holiday recipes.
My mom has always wanted to try new things, like making homemade pasta, and having a lemon tree, but baking bread has become her specialty. I try to help out as much as a sixteen-year-old can, but she truly has a gift for cooking, and I certainly do not.
My mom has made several different types of bread. She has made Sesame, Sour Dough, Cheese with Jalapeno etc. My personal favorite though has to be the sourdough. I may be a little biased just because I despise all spicy food, although my brother really loves the Cheese with Jalapeno bread.
The fresh bread in my household tastes just like the bread you would buy at any supermarket near you. It has a fantastic taste, a texture that feels like fluff inside your mouth, and a sensationally well done crust.
You can do many things with bread with it, but as my family is very Italian, we will dip it in everything, especially spaghetti pasta, which is another tradition in my family. It has its own wonderful taste but taking the juice from the bottom of the chicken or spreading butter is literal heaven that will make you want to eat more.
Making the bread will take up a lot of time in your day, but it is totally worth the wait. You have to free up at least 4 hours of your day for it, but if you are bored, why not make bread?
My family is very casual about in eating the dish. We just rip off a side of it and shove it straight into our mouths even before dinner has begun because it is exciting to hear that my mom is making bread tonight. And if there is still some left, one of us will swarm over it like ravaging birds.
Recipe
- 4 Cups of Flour
- 2 Teaspoons of Kosher Salt
- 2 Teaspoons of Sugar
- 2 ½ Teaspoons of Instant Yeast
- 2 Cups of Lukewarm Water
- Softened Unsalted Butter, For Greasing
Instructions
- In a large bowl, whisk together the flour, salt, sugar, and instant yeast. Add the water. Using a rubber spatula, mix until the water is absorbed and the ingredients form a sticky dough ball.\
- Cover the bowl with a damp tea towel or plastic wrap and set aside in a warm spot (see page 16) to rise for 1 to 1½ hours, until the dough has doubled in bulk.
- Set a rack in the middle of the oven and preheat it to 425°F. Grease two 1-quart oven-safe bowls with the softened butter- be generous. Using two forks, deflate the dough by releasing it from the sides of the bowl and pulling it toward the center. Rotate the bowl quarter turns as you deflate, turning the mass into a rough ball.
- Using your two forks and working from the center out, separate the dough into two equal pieces.
- Use the forks to lift each half of the dough into a prepared bowl. If the dough is too wet to transfer with forks, lightly grease your hands with butter or oil, then transfer each half to a bowl. Do not cover the bowls. Let the dough rise on the countertop near the oven (or another warm, draft-free spot) for 10 to 20 minutes, until the top of the dough just crowns the rims of the bowls.
- Transfer the bowls to the oven and bake for 15 minutes. Reduce the heat to 375°F and bake for17 to 20 minutes more, until evenly golden all around. Remove the bowls from the oven and turn the loaves out onto cooling racks. If the loaves look pale, return them to their bowls and bake for 5 minutes longer. Let the loaves cool for 15 minutes before cutting.
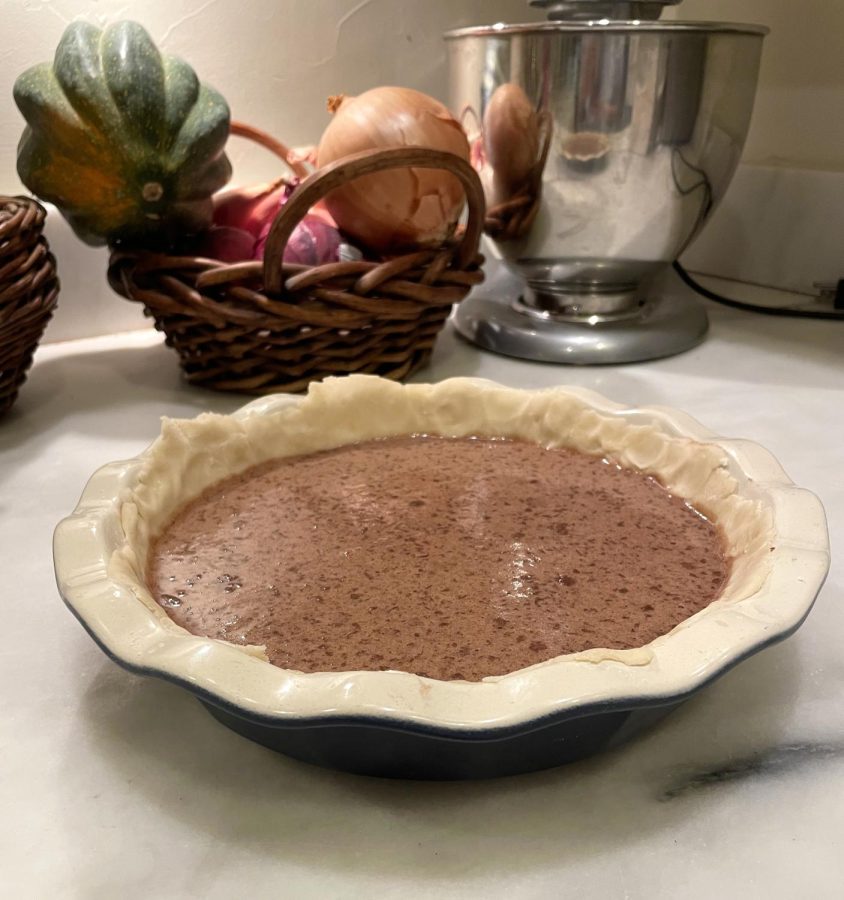
The freshly baked chocolate pie is displayed on the counter. The Howarth family first starting making the delicious dessert in the 1940s.
Howarth Family Chocolate Pie
My special recipe has been passed down over five generations and can make my family feel connected even if we aren’t together.
Whenever I get out of bed on any holiday, I know I will be making and eating my family’s iconic pie: the Howarth Family Chocolate Pie. The dessert has always been on the table whenever any family comes over for the holidays, and I’ve helped my mom make this recipe since I can remember.
The recipe has been passed along on my dad’s side of the family and has remained a tradition for years. It started with my great-great-grandma when she wanted to make something special for my grandma when she visited. Eventually, she decided on a decadent chocolate pie, since then my family has made this pie on special occasions like holidays and family dinners.
I first started taking part in the tradition when I was in kindergarten. I would make the pie with my mom until my brother was old enough to help, and then the three of us started making it together. Nowadays, my brother and I bake the dessert ourselves.
One of the most memorable times I made the chocolate pie was when we had a huge family gathering. All of our grandfathers, aunts, uncles, and cousins were in the same house, and it was chaos. With my cousins and I all working together, we managed to make enough delicious chocolate pie for everyone to share. In the end, sharing the family tradition with relatives other than my mom and brother was nice.
This pie itself is a fantastic treat. It has both great taste and texture, and is baked just enough to be crispy on the outside yet gooey on the inside.
I like to use a premade pie crust, but I roll it out and shape it myself. I bake it for the recommended time, and after it’s cooled down a bit, I put it in the fridge. Since the pie’s inside is gooey, having a cool pie makes it taste so much better.
I hope that your family can enjoy this pie as my family has done for generations. Make sure to always share it with your loved ones.
Ingredients
- 1 ½ tablespoons all-purpose flour
- 2 rounded tablespoons unsweetened cocoa powder
- 1 ½ cups sugar
- ¼ teaspoon salt
- 2 eggs
- ½ cups evaporated milk
- ½ teaspoon vanilla extract
- 4 tablespoons melted butter
- 9’’ pie shell
Instructions
- Preheat oven to 350°
- Sift the flour and cocoa powder into a large bowl. Whisk in sugar and salt. Stir in remaining ingredients. Mix well. Pour into pie shell.
- Bake 40 minutes or until done. If you stick a toothpick into the pie and still get thick batter attached, it needs a bit more time. Whipped cream is an option, but preferred.
Tim Tam Cake sits ready to be eaten. This cake is ovenless made in the microwave.
Ovenless Coale Cake
My family’s oven last worked in the early 2010s.
However, that never stopped us from cooking. After all, what’s a good kitchen without a microwave and a stove? Which is why we make Tim Tam cake as an our ovenless holiday desert.
A crucial part of this recipe comes from Australia, after my mom won a case for a client in Australia, they’ve repaid her every year by sending us a box full of Tim Tams. And so, with the limited options in front of us we make the cake.
I don’t remember when we started making the Tim Tam cake, but I do know what it means to me to have a symbol of my family dealing with a problem and solving it. It serves as a perfect summary of my family and an ideal treat. A lot can go wrong with this recipe, but that’s the fun part of it, no two times have I made it, and it really came out the exact same, from the first time I made it and it came out perfectly to the second time I made it and it came out as a jar of burnt goo.
You can make a lot of substitutions to the recipe for example instead of Tim Tams you can substuitute in Oreos. I’ve subbed everything under the sun in for cocoa powder. This recipe is what works for my family, but a big part of it is finding what works for you and your family.
Recipe
- Four Tim Tams
- ¼ cup milk
- One tablespoon flour
- One tablespoon sugar
- ½ tablespoon of baking powder
- ½ tablespoon of cocoa powder
Instructions
- Put three Tim Tams in a large bowl, pour in the milk, and crush up the Tim Tams using a spoon or fork, after that put in the flour, sugar, baking powder, and cocoa powder
- In that order, microwave for 1 minute or 1:30 and you should get a baked, mushy, warm result. And even if you mess up you should get a hot glass of chocolate milk
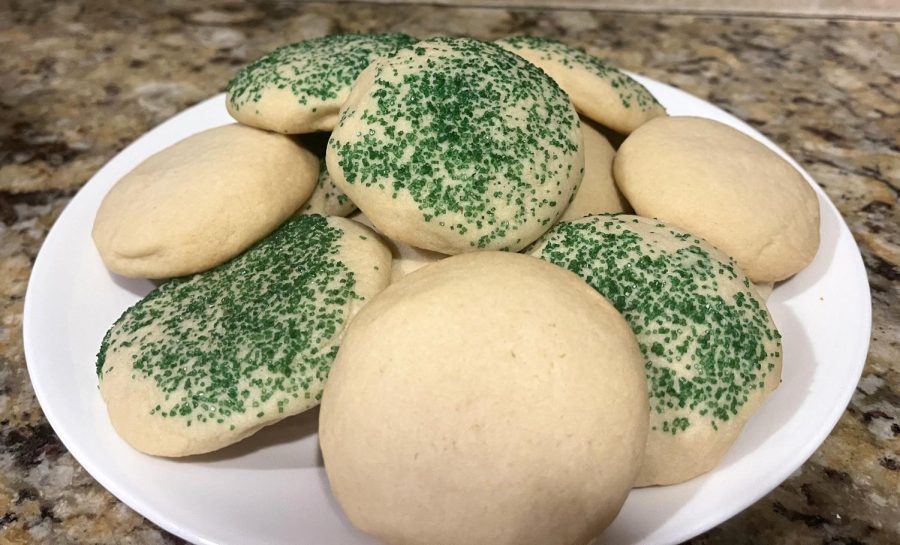
The sweet sugar cookies are freshly baked and plated. They have been decorated to look festive. for Christmas.
Sensational Maze Sugar Cookies
My family doesn’t usually stick to a tradition for Christmas or the holidays, but the one that has always managed to stick around my whole life is my stepmother’s homemade sugar cookies.
For as long as I remember, we make these delicious cookies and spend hours decorating them with all sorts of little things, making them extra special. On the weekend before Christmas, my whole family always gathers in the kitchen and makes all sorts of yummy holiday themed cakes, cookies, fudges, barks and more. But my favorite by far is the delicious, chewy sugar cookies we make and design.
This treat is a holiday classic that is simple and made from ingredients that can usually be found around your house and pantry. And the simplicity makes these cookies easy to enjoy for any occasion.
There are so many different ways to customize your cookies and make them to your own liking or for any holiday or occasion. You can use all sorts of sprinkles like sugar pearls, sanding sugar, multicolor, etc. And any fun frostings like buttercream or royal to add extra taste and texture. And, of course, my personal favorite, fun-shaped cookie cutters to give the cookies some character and creativity. The decorations always add such a fun, festive touch to the cookies.
I remember as a child, I would make these cookies into whatever I could imagine making anything from stars to tigers, sitting at my kitchen table covered to the brim in parchment paper, flour, cookie cutters, rolling pins, and all sorts of cookie making necessities, and make dozens of these sugar cookies. And then, when we were done, we would share the magic of them and give them to friends and neighbors when we had finished adding our final touches.
To make your cookies even more delightful than they already are, you can serve them with a glass of hot chocolate, warm cider, eggnog, milk, or any other beverage of your choice. I hope if you give this recipe a try, you can enjoy it as much as my family and friends do.
Ingredients
- 2 3/4 cups all-purpose flour
- 1 tsp baking powder
- 1/2 tsp salt
- 1 cup butter, softened
- 1 1/2 cups granulated sugar
- 2 eggs
- 1 1/2 tsp vanilla extract
Instructions
- Add the flour, salt, and baking powder into a bowl, mix, and set aside.
- In another bowl, add the softened (room temperature) butter, eggs. sugar, and vanilla. Beat with an electric mixer until smooth — about a minute.
- In three or four batches, add the dry ingredients to the wet, mixing until incorporated.
- Roll them into one inch balls or roll the dough out using a rolling pin and cut out shapes using a cookie cutter. Top them with sprinkles, sanding sugar, cinnamon and sugar, or anything else you can think of.
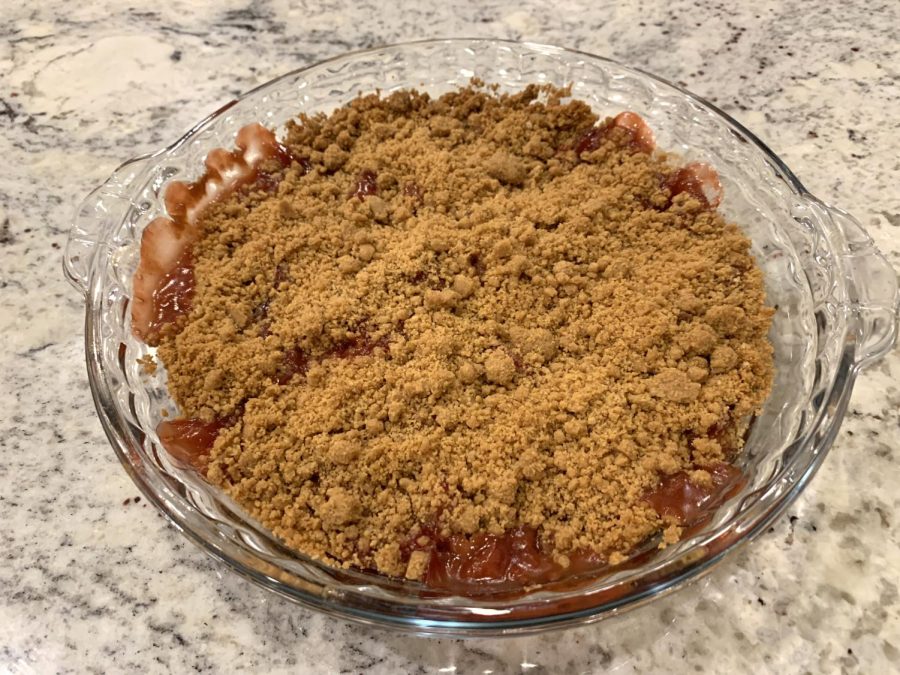
The crumble after it has been cooked and is ready to be eaten. The crumble tastes best when it is topped with vanilla ice cream.
Segal’s Strawberry Crumble
Most families make special foods just for the holidays. In my family, that special food is strawberry crumble.
Strawberry crumble was introduced into our family by my grandma. One Christmas Eve, my sister and I were begging our grandma to make a dessert. She was open to the idea, but wanted us to make a healthier dessert because we had stuffed our mouths with all kinds of sweets earlier in the day during our Christmas Eve day activities.
She suggested that we make strawberry crumble- a recipe she said she used to make with her aunt a long time ago. My sister and I were excited to make a new dessert that we had never had before. We made it that evening and had so much fun making it with our grandma while excited for Christmas morning the next day.
Strawberry crumble is a unique dessert. The bottom of the pan is filled with strawberries with a graham cracker crumble crust on top. This strawberry crumble is one of my favorite desserts because it is sweet, light, delicious and refreshing.
Once baked, the strawberries have a jelly-like consistency that tastes perfectly with the crispy graham cracker crust. The graham cracker crust is my favorite part of the whole dessert. It is sweet, salty, and a little bit crunchy and it tastes exquisite with the mushy softened strawberries. Graham crackers also have a strong taste, unlike regular pie crust that is bland. This graham cracker crust has a sweet, vanilla taste that consumes the mouth and brings nostalgia to when I was younger and used to use graham crackers to make s’mores.
Though, there is one thing better than the graham cracker crust and that is the smell of the house as it is baking. While the crumble is in the oven, it creates a grand smell that spreads to every corner in the house. It smells like a sweet cookie Christmas candle and leaves everyone with their mouths watering.
This is a dessert that is great for making with families because it is simple and multiple people can contribute to different parts. Someone can cut the strawberries, someone can crush the graham crackers, and someone can melt the butter. It is a great family bonding activity as well as holiday activity.
Strawberry crumble is a good dessert option to make because it is relatively healthy, and quick to make. It is a hit for both adults and kids and goes perfectly after any meal. I look forward to making strawberry crumble after Christmas Eve dinner with my grandma every year and will keep this tradition forever.
Ingredients
- 1.5 lbs fresh whole strawberries
- 5 tablespoons brown sugar
- ¼ cup and a tablespoon all-purpose flour
- ½ teaspoon Kosher salt
- 1 sleeve (9 pieces) of graham crackers
- 4 tablespoons butter
- 1 teaspoon vanilla extract
Instructions
- Preheat the oven to 350 degrees
- Cut the strawberries into into ½ inch pieces (about 2 ½ cups)
- Mix the strawberries, 3 tablespoons brown sugar, 1 tablespoon flour, and ¼ teaspoon Kosher salt into a mixing bowl and combine well. Transfer into a 9-inch round (or 8-inch square) baking dish
- Finely crush the graham crackers using a food processor or a gallon-size sealable bag and a rolling pin
- In a medium mixing bowl, whisk together the crushed graham crackers with ¼ cup flour, 2 tablespoons brown sugar, and ¼ teaspoon kosher salt
- Melt the butter and mix it with the vanilla in a small bowl. Stir this into the graham cracker mixture until the mixture is evenly moist and heavy crumbs are formed
- Sprinkle a generous amount of the graham mixture over the strawberries
- Cover with aluminum foil and bake for about 30 minutes or until the crust is golden brown and the fruit juices are bubbling around the edges of the pan
- Remove from the oven and let cool for 5 minutes. Serve with vanilla ice cream on top if desired