
A Pine-cone for Christmas
A Christmas themed DIY on how to make pine-cones into Christmas Trees
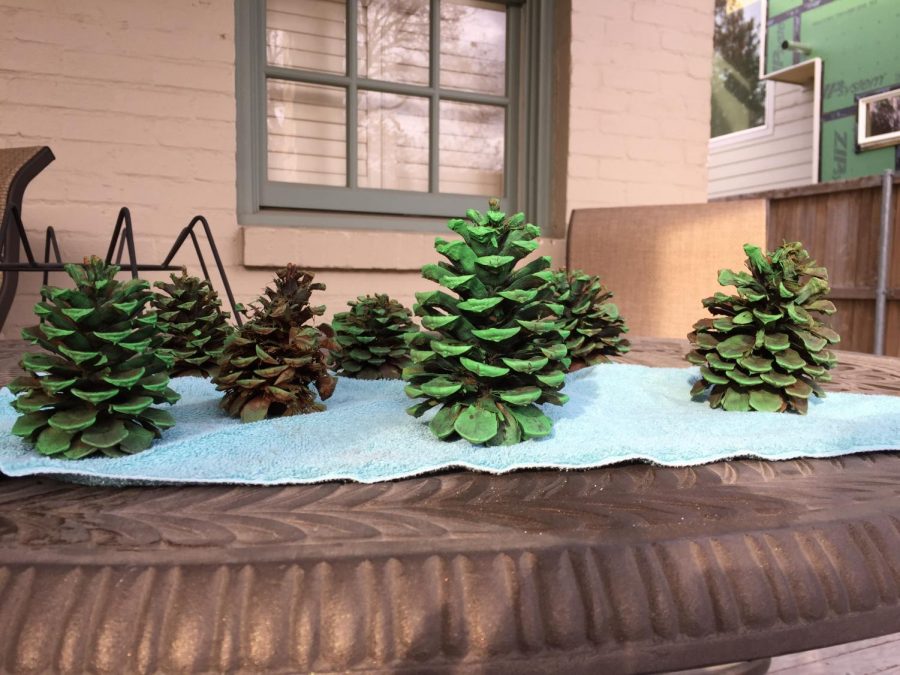
Fun Christmas themed DIY’s that are not only cost efficient but also easy to do with kids are so hard to find. All that is needed for this project is pine cones (of course), green spray paint (this part will need to be done by an adult or supervisor), tiny wooden stars, wine corks, and a hot glue gun. The hot glue will also need to be done by an adult since it is easy to get the glue on your fingers.
As far as the pine cones go, you might have some just laying around in your front yard depending on what kind of trees you have around the neighborhood. For my purposes, and since I don’t have pine cone growing on trees around my house, I had to purchase some at a store. For this I would definitely recommend going to Michael’s craft store because they had everything I needed for this project. I will give a major heads up though because around the holiday season there always seems to be an influx of people who have crafting needs.
After I purchased all my supplies thought, I felt like the hard part was done. For the first step the only things that were needed were the spray paint and the pine cones. This step should be done outside or in a more open area so that the paint fumes are not too overpowering. Spray the pine cones with the paint, and I would recommend just spraying the outside of the pine cones so that they look more like Christmas Trees, and not just green pine cones. Depending on the type of paint that you use your trees might take a while drying. Let them sit outside for a little bit so that they can not only dry but also to let them air out for a bit.
Once they are dry, bring them inside and put them on a tray. At this time you should also bring out the hot glue gun, the corks, and the stars. Allow for the glue to warm up completely before you begin gluing. In fact, while the glue is warming up, check the bottoms of the pine cones to see if it is somewhat smooth. My pine cones had little spiky things at the bottom, and the corks could not fit correctly and would make the pine cones slant to the side. If there are spiky things on the bottom, take a pair of plyers and cut that part off.
Once the glue is completely warmed and ready to be used, glue the corks to the bottoms of the pine cones. I recommend putting the glue on the cork and then sticking the tree onto it. From there, hold the pine cone in place till the glue is partially dry, or until the tree does not slide around. At this stage, put the tree back on the tray and allow for it to dry completely. After you have glued a cork to all the bottoms of the trees, you can glue the stars to the tops. Put glue on one side of the star and then attach it to the top of the tree. The star will also need to be held in place so that it does not slide off and move around. Hold it for about as long as you held the tree to the cork and then put the now completed Christmas Tree back on the tray. Repeat this until you have finished all the pine cones. Once you have finished, sit back and enjoy your new Christmas Trees.

12
What is your position on the Bagpipe:
Lead Section Editor
What is your go-to snack:
Nature Valley Bars
What is your favorite tv show to binge watch:
The 100
What are you most excited to get out of Bagpipe this year:
Designing
In what are you involved at HP:
Color Guard, Psych Club
What is your dream job:
Designing in some form
How would your friends describe you:
A Leader
What is your favorite song or style of music:
Alternative
What is a fun fact about yourself that not everyone knows:
I was born on 9/9/99
Where is the coolest place you have visited:
Disney Land
What is one skill at which you were better:
Rifle Line on Color Guard
What is your ideal pet:
Maltese, Poodle or German Shepherd
What is your favorite class this year:
Psychology
Where do you want to go to college:
Mizzou
What is your favorite news source:
Fox
What is the best piece of advice you have received so far:
Always do your best and never settle for anything less.
If you could attend any major event, which would you choose:
Any Baseball Game